How to Make Vanilla Extract

This is one of those things that’s so easy to make yourself that you’ll wonder why you never did it before. It’s basically the exact same thing as making an herbal tincture although you don’t need to pack it so tightly with the vanilla beans, and you might want to let it cure a bit longer than the average tincture.

All you need are a few vanilla beans which you can buy in grocery store bulk bins, online, or packaged in jars or bags like above in a spice aisle, alcohol such as vodka, rum, bourbon, or brandy, a jar and time.

DCEA082A-E46D-496F-98C4-5262E4E169DF[1]

I chose vodka because I want to use this extract in my DIY natural perfumes as well as in baking, and vodka has the most neutral scent. I’ll definitely be using the extract in the waffles that I make all the time, and these zucchini muffins too, so it’ll be versatile and well used with the vodka. As with all things herbal, there are plenty of variations with which to experiment, but basically you want at least 4 vanilla beans per cup of alcohol. First split the vanilla beans down the middle lengthwise with a sharp knife.

450565AC-B97F-4AE1-939D-F629A494535B[1]

It’s hard to tell, but the bean closest to the knife has a long slice down the middle. Next, put the beans in a clean glass jar, then pour the alcohol over them, making sure they are completely submerged.

56D9408A-1DB7-4432-BD75-98728090FE94[1]

Cap the jar or bottle tightly, then shake it daily (or at least every other day after the first week) for at least four weeks.

At this point the vanilla extract can be used, but you will probably still smell the alcohol, so it depends on whether you are baking with it or using it in a non-heated recipe like frosting if you taste just vanilla or the alcohol as well. (The heat in baking and cooking will get rid of the alcohol taste/scent.) After two to three months, the vanilla extract should smell only of pure, rich vanilla. That means, if you want to make holiday gifts of homemade vanilla extract, you will want to get this started by early October. (Yup, already thinking along those lines!) Also, the more beans you originally put into the mixture, the more vanilla-y it will be, so keep that in mind. You want at least four per cup, but you can definitely add more than that. Vanilla beans are the second most expensive spice, after saffron, due to the delicate harvesting and curing of the beans, so sticking with four per cup is perfectly fine.

You don’t have to ever take the beans out actually, though if you are giving some of yours as a gift, taking out the old beans and adding a fresh one to the container looks lovely and continues to add depth and richness to the extract. (You don’t even need to cut it down the middle at that point.) Vanilla extract lasts indefinitely if stored in a lidded container in a relatively cool, dark place.

Enjoy, and if you love making your own herbal concoctions, check out my latest course on the Art and Craft of Herbalism. Take care and enjoy the transition to cooler days, crisper nights, and crunchier walks. Please subscribe for weekly posts about herbs, natural health, and green beauty, and please share this with anyone who might be interested.

Lentil Soup and Supps on the Go

I took a short trip to Portland and the Oregon coast for a few days this week. On the little getaway I was able to try a couple of the New Hope Blogger Box supplements because they were conveniently packaged for portability. F8F114EC-3821-4B1C-B3BA-28D6734E4E12[1]

I didn’t take a lot of supplements with me since it was such a quick trip, so these two products were perfect to take along. The Green Vibrance by Vibrant Health is chock full of superfoods, probiotics, and tastes delicious. The chocolate coconut flavor does not disappoint. I was really happy to be able to take such a nutrient-packed supplement which covered a lot of bases all in one convenient powder packet. I believe the actual product does not come in these little packets by the way, but instead in a more eco-friendly container which works better for everyday use.

This collagen booster below from Fusion Naturals is vegan, tastes naturally fruity, and is in attractive packaging which I always thoroughly appreciate. It is lovely from the outside and delicious tasting so definitely a quality product. I like using a jar to shake up the powder with the water, but on the trip I just put the powder in a glass of water and stirred with a spoon. Either way works. 9FE53C8F-171D-4B58-812E-68D55A51E6F4[1]

Inexplicably, I’ve been craving soup this hot, hot summer. Cooking it sounded like too much of a sweat session (we don’t have A/C) so I’ve just left the desire alone, marinating until crisper fall days. Until today that is. It’s only 68 degrees and since I’ve just come back from the Oregon coast where we had one warm day, one cool day, and one in-between, that cool day really got my thoughts revolving around soup until there was no chance of putting it off anymore. Lentil soup is one of my favorites, and each time I make it the recipe is a bit different. The things I always put in are garlic, onion, leeks, and potatoes, but sadly I didn’t remember the leek at the grocery store today. I added a sweet potato this time, just because I had one on hand, and carrots which are regular items. Lentils are one of the few legumes that don’t need to pre-soak before cooking, but a rinse does the dry beans good and it also gives the cook a chance to pick them over and toss out any that are discolored or any items that are not in fact legumes that might have gotten mixed in with them, especially if you buy them from a bulk bin. Here’s today’s recipe:

98349DF0-652C-4BD5-9C55-97A2593031E2[1]

Lentil Soup

About 1 Tablespoon of olive oil

1 Yellow Onion

2 or 3 garlic cloves

2 medium sized carrots

2 potatoes

1 sweet potato

1.5 Cups French Green Lentils

5 Cups of vegetable broth

About 1-2 teaspoon (to personal taste. I like a lot of herbs in there.) each of Thyme, Oregano, Basil, Black Pepper, Sea Salt and a Bay Leaf

Chop up all the veggies in small pieces, making them all around the same size. Coat the bottom of large pot with olive oil (or another oil of choice) and start sauteing the onion until translucent, about 3 minutes. Add the other veggies and cook for another couple of minutes before adding the thyme, oregano, basil, and black pepper. Cook another couple of minutes, then add the broth, lentils, and bay leaf. Bring to a boil then turn it down to a low simmer until the lentils are soft which takes about 35-40 minutes, but it depends on a couple of factors, including the age of lentils. Once the lentils are soft, then add the salt to taste. Take the bay leaf out once the soup is finished. It’s always better the next day and just gets better over the next couple of days. This version is good but I miss the leek or two I usually have in it. It tastes great with either bread or rice and of course, if you like a thinner soup, add more broth or water. Also, you can always replace the teaspoons of herbs with a bouquet garni, preferable wrapped in the outer layer of a leek.

0D8D70D7-383A-4DB5-A577-19727E390EED[1]

Enjoy the second half of August! Late summer moving into early fall is my favorite time of year. More soup recipes will be coming shortly I’m sure, as well as some bread recipes for serving with them and I’d be forever grateful if you shared this with anyone who might be interested and please subscribe for weekly posts about herbs, natural health, and green beauty. Best health to you and yours!


The Future of Milk

Would you like some almond juice in your coffee? Or liquid soy on your cereal? It doesn’t sound quite right but that might be what the future holds if the dairy industry gets its way. Apparently the FDA is considering banning the word ‘milk’ on plant based products because according to their standards’ definition, “Milk is the lacteal secretion, practically free from colostrum, obtained by the complete milking of one or more healthy cows.” That is not the full definition, but the full definition does not include plant based milks at all, even though dictionaries and long common usage have indeed used the word milk for plants. Here’s Merriam Webster’s definition:

The FDA can’t wave a wand and wipe the shelves free of plant based milks that easily of course, and this is certainly going to get a lot of debate, and here’s where that debate starts: They are holding a public hearing to begin the discussion on July 26th in Maryland, but you can make an electronic or paper submission if you want to add your thoughts to the discussion. Something along the lines of, “Are you serious?” seems appropriate. Moooooving on~

Here’s a breakfast recipe from Delicious Living for Muesli. Recipe and photo below are both by Lori Eanes. Feel free to add any kind of milk you want.

Muesli

Muesli is a great alternative to expensive packaged cereal, and it’s filled with fiber, protein and flavor. Eat it with yogurt, almond milk or dairy milk, and you’ll stay full all morning.

Ingredients:

  • 3 cups old-fashioned, gluten-free rolled oats
  • 1 cup sliced almonds
  • ½ cup unsweetened coconut flakes
  • ½ teaspoon salt
  • 2 tablespoons olive oil
  • 1 teaspoon vanilla extract
  • ½ cup raisins
  • 1 cup chopped, dried cranberries or apricots

Directions:

  1. Preheat oven to 325Ëš. Mix first six ingredients (oats through vanilla) in a large bowl. Line an 11×18-inch rimmed baking pan with parchment. Pour mix onto pan. Bake 15–20 minutes or until coconut flakes are light brown. Cool.
  2. When cool, stir in raisins and dried cranberries or apricots. Transfer to an airtight container and use within a week, or freeze for longer storage.

PER SERVING (1 cup): 488 cal, 17g fat (8g mono, 3g poly, 5g sat), 0mg chol, 238mg sodium, 75g carb (10g fiber, 26g sugars), 13g protein

It’s hot here in the PNW where a/c is not the norm so cooking is the last thing I feel like doing, especially when it comes to dinnertime. Time to bring out all the salad recipes I can find I guess. Let me know if you have any dinner tricks for surviving summer heat waves~ I’d love some new ideas. Enjoy the rest of your week and please subscribe for more recipes and posts about herbs, natural health, and green beauty, and please share with anyone who might benefit from this article.


Zucchini Muffins (Gluten-Free, Dairy-Free, Egg-Free, Nut-Free)

My sons still talk about the zucchini muffins I made years ago and ask me to make them again. I only made them once because shredding the zucchini by hand took me ages that first time, but now I’m ready to try again with perhaps the help of the blender. I looked up the recipe on my old blog and found I’d written it in 2014! Those muffins must have been better than I remember for my kids to still have a hankering for them four years later. Here’s the (slightly edited) original post with the recipe, though next time I’ll probably add another teaspoon of cinnamon which means a full tablespoon.

My friend gave me a zucchini the size of large 2 month old baby so I figured I’d switch my plan of making pumpkin scones to zucchini muffins. After looking for a recipe online that I could play with, I realized there wasn’t much out there that had all our needs covered~ gluten, dairy, egg, and nut free, so the “playing’ part was rather extensive. Anyone who believes that old adage, “Baking is a science, cooking is an art” has obviously never baked with food intolerances in mind. I can’t say it’s a perfect recipe as it was indeed my first go at it, but they didn’t crumble (and no xanthan gum!) and they taste pretty good. (My kids love them.) Plus we used that freaky zucchini so now my sons no longer have a prop pretending to be cavemen which was getting to be a bit much every time we were in the kitchen. I must admit though, it really did look like a primitive weapon. Here’s the recipe:

zucchinimuffins3

Ingredients:

2 T flax meal + 5 T water (set aside at least 10 minutes)

2 C grated Zucchini

1/2 C apple sauce

1/4 C sunflower oil

1 t vanilla extract

1 C brown rice flour

3/4 C oat flour (make sure it’s gluten-free)

1/2 C millet flour

1/4 C tapioca flour

3/4 C brown sugar

2 t cinnamon (or more~ actually will do more next time, but it’s personal taste)

1 t nutmeg

1 t baking soda

Preheat oven to 350. Prep muffin pan with oil, spray oil, or liners. Add the grated zucchini, apple sauce, oil, vanilla extract, and flax that has soaked in water all together and mix well. In a separate bowl mix the dry ingredients together before blending the wet and dry together~ easily done with a spoon, no need to get your mixer dirty. Fill the muffin pan~ 12 regular sized muffins. Cook for 23-25 minutes.

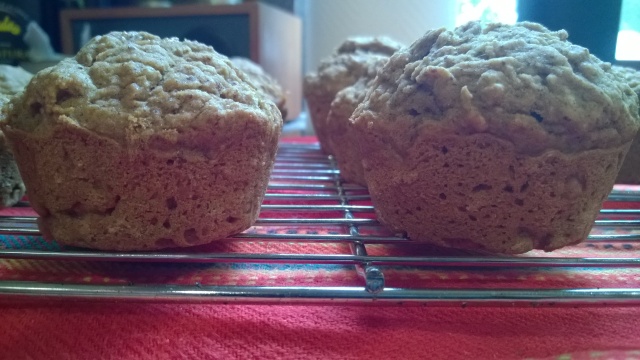
Two zucchini muffins
Don’t these look good for a recipe without xanthan gum?!

These were good out of the pan but I did think a little more cinnamon would have made them better so I sprinkled some cinnamon sugar on top. My boys don’t mind the extra sweetness although they’ll probably miss running through the kitchen yelling “Aaarrrgh” with the zucchini.

It’s not quite the 2018 zucchini season here yet although the berries have been going strong for a couple of months now, so I’m expecting it won’t be long before backyard summer veggies start popping up. Happy Summer Solstice! Make sure you enjoy the sun safely this summer and please subscribe for weekly posts about herbs, natural health, and green beauty, and please share with anyone who might benefit from this article.

Gluten-Free Waffles and Cinnamon Bread

When my kids were going through a period of food restrictions due to intolerances, giving up gluten was by far the hardest part. Waffles came in handy as bread substitutes because gluten or no gluten, waffles are almost always yummy. I could pack them in my sons’ lunch boxes either plain, or with peanut butter between two just like a sandwich, and they loved it. (If you have never tried peanut butter on waffles before, you have to try it. It’s way better than it sounds.) Now they are able to eat gluten again, one more often than the other, but I still make the waffles gluten free and egg free for easy breakfasts. I make a double batch and just stick them in the fridge for a quick warm up on school days, and if they ever didn’t eat them all up within a couple of days I’d put them in the freezer, but that hasn’t happened yet. I like using Pamela’s Baking and Pancake Mix, but it does contain almond meal and buttermilk in the ingredients so if you are avoiding dairy and/or tree nuts, use another brand such as Enjoy Life Pancake and Waffle Mix and follow their instructions for flour to liquid ratio, and add in the other bits down below as desired.

0B2D021F-1459-4D57-9833-E43DB0EF0CA4[1]

With Pamela’s mix, to make about 8 waffles, you will need:

4 T flax meal with 3/4 cups warm water (or 4 eggs)

2 T sunflower oil or another oil you like

1 t ground cinnamon

1 t vanilla extract

1.5 cups water

3 cups Pamela’s Baking and Pancake Mix

3/4 cups chocolate chips (optional but my kids’ favorite part)

To make:

Add the flax meal to the 3/4 cups of warm water and set aside for about 10 minutes. If using eggs, just blend everything together all at once. Eggs make more golden waffles but I use the flax meal because of the good omega-3 oil and the fiber, plus one of my sons had to avoid eggs for a while (intolerance) so I don’t like him to eat them all of the time. If using the flax, add the ingredients to the flax and water in the order I’ve written them above. Stir until just mixed, then load about 1/2 cup of the mixture at a time into the waffle iron. I spray my waffle iron each and every time with coconut oil, but I’m sure you know your specific iron’s needs.

D705522A-63B2-4CE6-9315-6EC26EA822D0[1]

These make an easy snack too. When anyone first does an elimination diet or is told they can no longer eat certain (usually favorite) foods, it really helps to have tasty alternatives to rely upon to help ease that sense of loss. It truly is a grieving period, and for kids it can be especially incomprehensible, plus it’s hard on the parents who have to suddenly scramble as well. Even adults need to know they still can enjoy delicious foods every day, even if they are not exactly the ones they relied upon for years. Any time familiarity can be reestablished, a person’s sense of security, and therefore confidence grows, and it really does take all of that and more to stick with avoiding favorite foods. It also helps to know that if it is an intolerance, rather than an allergy, you really can beat it (in most cases) as long as you systematically work on building up your digestive tract as well as avoiding the trigger foods for as long as it takes. You will inevitably find new comfort foods, healthy choices that provide both healing and joy, but the process can bring up uncomfortable feelings until you hit on those perfect-for-you finds. Go easy on yourself until you get there.

Here’s another comfort food recipe for the gluten-challenged. This one comes from Delicious Living and I plan on giving it a next weekend. One of my favorite activities to do on Sunday afternoons is to bake while listening to one of my favorite podcasts, such as Wait Wait Don’t Tell Me or This American Life, and considering this is a bread, and it has cinnamon, I know it’ll be worthwhile for my family because we love bread and cinnamon (as you might have guessed from the quite large bag of cinnamon I keep on hand in the picture high up above.)

Gluten-Free Cinnamon Roll Bread

For the Bread:

  • 2 cups gluten-free all-purpose flour
  • 1 tablespoon baking powder
  • ½ teaspoon salt
  • ¾ cup sugar
  • 1 egg
  • 1½ cups milk
  • â…“ cup plain Greek yogurt
  • 1 teaspoon vanilla extract
  • FOR THE SWIRL
  • â…“ cup brown sugar
  • 2 tablespoons unsalted butter (melted)
  • 2 teaspoons ground cinnamon

FOR THE GLAZE

  • ½ cup powdered sugar
  • 2 tablespoons milk

Directions:

Preheat oven to 350Ëš. Grease bottom and sides of a 9-inch loaf pan; set aside.

  1. In a large bowl, combine flour, baking powder and salt. In a medium bowl, combine sugar, egg, milk, Greek yogurt and vanilla; add to dry ingredients, and mix until well combined. To make the swirl, in a small bowl, combine brown sugar, melted butter and cinnamon.
  2. Pour about ⅓ of the batter into prepared loaf pan. Spoon ½ of swirl mix into a few spots in the batter; use a knife to swirl around. Top with another ⅓ of batter, and spread evenly. Repeat the swirl step. Add the last ⅓ of batter. Use knife to create swirls.
  3. Bake in oven for 45–50 minutes or until toothpick comes out clean when inserted. Remove bread from oven, and allow to cool. In a small bowl, combine powdered sugar and milk; pour over bread.

PER SERVING (1 slice): 223 cal, 3g fat (1g mono, 0g poly, 2g sat), 24mg chol, 206mg sodium, 43g carb (0g fiber, 26g sugars), 3g protein

May your days be filled with optimal health that is tailor made for you, and please subscribe for weekly posts about herbs, natural health, and green beauty, and please share with anyone who might benefit from this article.

DIY Bath Salts Mother’s Day Gift

What mom doesn’t treasure her bath and beauty time? Whether you are making a gift basket for your mom as an adult, or helping little ones make gifts for your partner, natural DIY pampering gifts are easy to make and will actually be used and appreciated. If you are working with little ones, essential oils need to be handled with care because they are so potent they should not be put on the skin directly without a carrier, and also the scents can be overwhelming if you are using a lot all at once.

To make a custom jar of bath salts, you have some options. You can use sea salt, Epsom salts, pink, grey, or black salt depending on where you are and what you fancy. Epsom salts are best known for aches and pains, but pink and grey salts can help with those too, and they have a high mineral content. Sea salt and black salt are detoxifying, and all the salts are good for the skin. You can also blend different salts together if you can’t decide or want to make sure you cover all the salt benefits. Whatever salts you use, just fill a jar with them, and add the essential oils you want in a ratio of about 10-25 drops per cup, depending on how strong you want the smell. Mix with a chopstick and cap tightly.

To make it a moisturizing bath soak, you can almond oil or grapeseed oil to the salts slowly, mixing the blend as you pour. You will want about 1 3/4 cup salts, with 1/4 cup oil. When the oil and salts are all blended together, add your essential oils and stir some more to make sure everything is evenly distributed. Since this is a total of 2 cups, you can use 20-50 drops of essential oils.

If you are making this for someone who takes more showers than baths, then a salt scrub is another option. You want more oil than salt in that case~ 2 cups of almond or grapeseed oil, 1 cup of fine sea salt, and 20-50 drops of essential oils. You can always make an herbal oil first, then add that to the salts. Add the oil directly on top of the salt, then add the essential oils and stir well. You can use sugar instead of salt for a gentler body scrub. Prepare the exact same way as the salt but use brown sugar instead.

Another option is to add dried herbs to the salts. This of course looks lovely but can make a huge mess, so adding a large sized muslin bag or two to the jar of bath salts is a nice touch. The bather can spoon in however much they want into the muslin bag, then place it into the bath for a nice soak that they don’t have to worry about cleaning up later. Lovely herbs to add are rose petals, calendula flower tops, seaweed, and/or oats. The proportions are completely up to you, and in fact you can just use herbs for an herbal bath without any salts, or just add the salts and herbs together, or add essential oils to the mix as well. There are no hard and fast rules, so just follow your aesthetic sense or look to your (or her) favorite products to get an idea of what proportions might be most appreciated.

As always, be sure to label whatever you make and to write down the recipe. Here are some more DIY gift ideas if bathing isn’t the best treat for your gift recipient. Have fun with whatever you are making and Happy Mother’s Day to all the hard working mamas out there. Please subscribe for weekly posts about herbs, natural health, and green beauty, and please share with anyone who might benefit from this article.

Toner DIY with Infused Ingredients

Toner is used to balance the skin’s pH after cleansing, and it can be made from a multitude of natural ingredients, which makes it especially easy to blend your own at home. You can even just simply use a hydrosol as a toner, or witch hazel, or even just make green tea, let it cool, then bottle it and spray it on your face/body. (That green tea toner needs to be kept in the fridge and should be used within three days.) I like making toners that have more ingredients in them because I enjoy getting as many benefits out of my products as possible, and infusing those ingredients with herbs makes them even more nutrient dense and beneficial. My first toner recipe is very similar to the one below, but this time I first infused vegetable glycerin (also spelled glycerine) with rose buds to get all those wonderful rosy healing attributes as well as the gorgeous color and scent. You certainly don’t have to do this, but adding glycerin to your toners or other products makes them more emollient and protective because it brings the moisture from the air into your skin and adds a protective layer to the skin as well. Food grade glycerin can be taken internally as well, and makes for a kid-friendly extract because it’s sweet and alcohol free. Aloe is a firming agent and can be used alone as a mask on your face for quick toning and firming action. Witch Hazel is astringent and pH balancing and can also be infused with herbs. I used Geranium essential oil because it is good for all kinds of skin, and Carrot Seed essential oil for the vitamin A. I added a drop of Turkish Rose essential oil to complement the rose infused glycerin. Use whatever essential oils you like best, no more than 10 drops in 4 oz. of liquid though, and less than that if your skin is sensitive. This actually smelled quite nice without the essential oils but I like the therapeutic effects of the ones I added, but do start with smaller amounts if you are new to making your own skin care.

Recipe for Rose infused Glycerin:

Fill a jar 1/2 to 3/4 full with rose petals or whatever herb you are using. If using buds like I did, bruise and chop them up a bit first.

Add a mixture of vegetable glycerine and distilled water in a proportion of 1/4 distilled water to 3/4 glycerin. If you are using fresh herbs, no distilled water is needed.

Make sure the herbs are covered completely, shake them up daily for two weeks, then strain. Glycerin is ready to use.

The rose buds I used went from dark pink to white in about 24 hours. I was so surprised! Keep both the marinating product and finished product out of heat and light.

1CC8D5B1-443D-472F-90ED-CB46BEA96694[1]

Toner:

4 oz. Bottle (dark glass preferable)

1/4 C Witch Hazel

1/8 C Aloe Vera gel 

1 teaspoon rose infused glycerin (or plain glycerin)

Distilled water (enough to almost fill the bottle, just leave room for the essential oils if using)

1-2 drops Turkish Rose essential oil

4 drops Geranium essential oil

4 drops Carrot Seed essential oil

Put the first four ingredients in a dark glass bottle and shake it up. Add the essential oils (if using) and roll the bottle in your hands to blend. Shake before using.

Be sure to label your bottle and write down your recipe.

Making your own toner is a great place to start with DIYing your natural beauty regimen because it can be as effortless as one ingredient, and it’s hard to go wrong. Start simple and add ingredients as you figure out what works best for your skin and your sense of smell. Most of all, have fun creating, and please subscribe for weekly posts about herbs, natural health, and green beauty, and please share with anyone who might benefit from this article.


Gluten Free Peasant Bread and Quiche

If you are following a gluten-free diet, then you know how hard it is to find a good peasant bread, or really any bread that feels special enough for holiday events or gifting. This peasant bread recipe is that something special. It is easy enough for novice bakers and can be made into an herb bread if desired. The texture is perfect for accompanying soups and salad, or just cutting off a piece and adding any sort of spread on it. I’ve  never had to toast this bread and I seriously cannot say that about any other gluten-free bread I’ve had, even the loaves of fresh bread from a nearby gluten-free bakery. Since spring brings with it Easter, Passover, Equinox celebrations, and Mother’s Day, I thought this would be a good time to share the recipe here although I have it on my previous blog so it might sound familiar to some of you. It’s the most visited post on that site by far.

The actual how-to will take you to another blog where I found a regular bread recipe that sounded like it’d be a good fit for gluten-free flours. This is because it is a no-knead bread, and that works well for gluten-free breads since kneading is done to activate gluten’s stickiness, but other flours do not react the same way. Gluten-free breads are always made with several different flours and starches in an effort to mimic that ‘glue’ that gluten naturally gives to wheat, rye, and barley. I use a lot of oat flour in my breads but you can substitute other gf flours or even just go with a gf bread mix such as one from Jovial, Pamela’s, or Manini’s. I find the bread turns out best with the flour combination below, but the pre-made mixes are great in a pinch, though if you do use one, adjust the salt according to how much the mix already has in it. (You’ll have to do a bit of educated guesswork.) Those three websites all have great recipes by the way, so if you are looking for more gluten-free ideas, check them out.

For the Peasant Bread, follow this link to the how-to, but replace the flour with: 1.5 C of gluten-free oat flour, 1 C millet flour, 1/2 C tapioca starch, 1/2 C brown rice flour, and 1/2 C sorghum flour. You can add 1 teaspoon of xanthan gum or psyllium husk powder for a more even texture if you wish, and I replaced greasing the bowls with butter with olive oil to make the bread dairy free. When greasing the pyrex bowls, really layer it on because I’ve ruined several crusts with not enough oil on the bowls. I think it works even better to spray the bowls with either coconut oil or olive oil instead of just using the liquid version so you can really layer it on. Whatever you use, use a lot. If you aren’t gluten free, try it in the original form and let me know if it’s good that way too. I bet it is and it’s so easy!

peastantbreadpeastantbread1peastantbread2

Make this bread with the quiche recipe below for a special holiday meal or just to make a regular weekday feel special.

This quiche recipe from Delicious Living sounds perfect for Easter Morning brunch, but the way Amy Palanjian has written it makes it actually a great weekday option as well because you can make it ahead of time and just grab on busy mornings. Either way, it’s naturally gluten-free without substitutions. Here’s the full recipe courtesy of Delicious Living.

Herb and Goat Cheese Crustless Quiches-promo
Picture is Palanjian’s

Thyme’s vibrant flavor enhances mild goat cheese and eggs and aromatically complements parsley’s steady flavor. Make these easy, egg-based bites up to three days in advance, and store in the fridge for a quick power breakfast on busy days.

Ingredients:

  • 1 shallot
  • 1 cup packed and shredded baby spinach or kale
  • ½ cup lightly packed, minced fresh parsley
  • 2 tablespoons fresh thyme leaves
  • 8 eggs
  • ½ cup crumbled goat cheese
  • ½ cup low-fat (1 percent) cottage cheese
  • â…“ cup cornmeal
  • ½ teaspoon salt

Directions:

  1. Preheat oven to 375°, and grease a standard muffin tin with cooking spray.
  2. Chop shallot, greens, parsley and thyme in a food processor. Stir together with remaining ingredients in a medium bowl. Divide evenly into prepared pan, filling each cup about two-thirds full.
  3. Bake for 20–22 minutes. Remove from oven, let cool for 2 minutes in pan, and run a paring knife around edges to loosen. Serve warm.

PER SERVING: 87 cal, 4g fat (2g mono, 1g poly, 2g sat), 127mg chol, 201mg sodium, 5 carb (0g fiber, 0g sugars), 7g protein

Please subscribe for weekly posts about herbs, natural health, and green beauty, and please share with anyone who might benefit from this article.

How to Make Rose Oil (Quick Method)

There are two traditional ways to make an herbal oil. The first method is referred to as the Folk Method, the Cold Method, or even the Solar Method although you can do it in the winter without the sun’s help, it just means that no artificial heat is used. Letting the sun help with herbal infusion is recommended though when that is an option, but here in the Pacific Northwest, there are few months in the year when that is viable. The cold method is what I used in the video series one and two where I infused olive oil with Roses for about 4 weeks. This method that I’m sharing below is called the Quick Method or the Hot Method because it is done on the stove-top and you have your oil in a matter of hours instead of weeks. So you might be wondering why everyone just doesn’t use the hot method if it’s so much faster, and the answer to that is the Folk Method in herbalism is generally the preferred method for best preserving all the healing properties of an herb. With the artificial heat comes the chance of over-heating and ruining some of the herb’s beneficial attributes, as well as the oil’s beneficial attributes. Many aspects of herbalism have a Folk Method vs. a Quick Method, with even the microwave being employed at times in Quick Method recipes, such as melting wax for lip balm for example. If you are mindful of keeping the heat on low and using a double boiler approach, this method should give you fabulous, fragrant oil that you can use the same day on your skin or in a more extensive recipe. If you are not pressed for time though, using the Cold Method is actually simpler and offers less opportunities for damage to the herbs and oil.

F50B9E08-6402-4FB6-A366-8771FF230DA6[1]

Herbal Infusion in Oil using Quick Method (Hot Method) 

Put your herb or herbs into the top of some kind of double boiler. I use a measuring glass in a pot of water. Add the oil of choice (olive oil is most common and what I use, but you can use something different such as sweet almond oil or grapeseed oil). The oil should more than cover the herbs, with plenty of room for movement.

Fill the bottom of the double boiler with water, then place it all on low heat. This mixture should stay on low heat until the oil takes on some of the color and fragrance of the herbs, so count on at least one hour, then let the mixture cool before straining and bottling. Some recipes have the oil on low low heat for up to 48 hours so don’t worry about letting it sit on heat for too long. Dried herbs are preferred because anytime you introduce water into an oil preparation, you also introduce the potential for bacteria. Fresh herbs are called for in certain cases, such as with St. John’s Wort which makes a fantastic massage oil since it eases aches and pains, in which case it is recommended to dry wilt the fresh herbs for 24-48 hours before placing them in oil. Stir the herbs while they are on the heat every once in a while with a wooden chopstick.

Because I have Rose buds instead of Rose petals, I bruised and chopped the buds a bit with the largest blade I have before adding them to the oil. The more surface area available on your herbs, the better, and bruising them starts the process of releasing their oils and fragrance.

This often gets people asking, why not use herbal powder then…? You can use herbal powders, but straining the finished oil is difficult, and you might not ever get it completely free of the powder. If you do use a powder, plan on straining with a clean coffee filter two or more times, instead of straining with a cheesecloth over a stainless steel strainer. Once the herbs are strained from the oil, store in a glass jar in a cool, dark place for up to six months and always check for rancidity before using (the smell will be ‘off’). If you can refrigerate your oils, they will last longer.

Use rose oil as a moisturizer or serum alone, or add essential oils to it for even more benefits, or use the oil in recipes for lip balm, healing salves, or body butters. Rose is known to be hydrating, softening, beautifying, and particularly good for mature and/or sun damaged skin. Other good herbs to infuse into oils are calendula, lavender, or peppermint which is particularly revitalizing for tired feet and legs. Get creative with whatever you have in your particular corner of the world.

Happy Spring to everyone in the Northern Hemisphere. I hope the change of seasons has infused everyone with lightness and loveliness. Enjoy and please subscribe (top right or down below if on mobile) for weekly posts about herbs, natural health, and green beauty, and please share with anyone who might benefit from this article.


Cleaner and Greener Laundry

It was recently my birthday and I was going to ask my friend for dryer balls because I knew she made them as gifts for others, but then it occurred to me to instead ask her to show me how to make them, and that maybe others would like the directions too. She is always up for a crafting date, even if it involves awkward videoing and way too many photos, (such a good sport!) so below is the tutorial of my multi-talented friend Lani teaching how to make the inevitable task of laundry a bit greener.

873EEE91-8D10-46B6-BC28-195E2087D2D5[1]
Lani
Not everyone is ready to switch to a natural laundry detergent, but just about anyone can reduce their ecological imprint by cutting drying time with wool dryer balls. If you replace fabric softener completely with these balls, then that makes each load even more environmentally friendly, not to mention budget friendly. If you like the scent of fabric softener, you can add a couple of drops of essential oil to your dryer balls before throwing them in with a load and that gives you complete control over how your clothes smell, without unhealthy fragrances and such. Wool dryer balls are incredibly easy to make and there is hardly any packaging involved, plus no weird chemicals. You can buy them of course if you are not in the mood to roll wool, but trust me when I say, anyone can do this. Be aware of the kind of wool you buy because it needs to be able to felt. 100% Roving wool is what Lani told me to get and it worked well.

If you are perusing natural laundry detergents though, I have a fun fact for you. You know that brand Country Save? It was founded (in Washington state) by a guy named Elmer Pearson. Any ideas on what other product Mr. Pearson is behind…? The clue is in his name. Or should I have said glue, instead of clue? Yes! Elmer’s glue! He didn’t get rich off of that ubiquitous glue by the way because he never held the patent, but you can read more about him here if you are interested. Back to dryer balls, here’s what you need:

B9E879BB-BC76-4629-A996-20C6FBC5357E[1]

Wool Dryer Balls

Roving Wool (One skein will make approximately 2 balls)

Pantyhose or nylon knee highs (that you aren’t going to wear anymore)

Scissors

A large eyed needle or crochet hook (There are two below the yarn, and together they look like tweezers, but they are just needles).

To start, wrap some yarn around three fingers about 10 times, then take it off your hand and wrap it the other way a few times. Here’s a video of Lani showing how to get the ball rolling (har har):

Continue wrapping up the ball into a round shape until the ball is around softball or baseball size.60CC06EA-3A85-42CD-B760-E6E47C36BC39[1]Once your ball is a good size, take a large-eyed needle or crochet hook to bury the end of the yarn into the ball. You can completely bury it, or cut off the end of the yarn after a few tucks if you prefer. Here’s Lani showing how it’s done:

Once the balls are complete with the loose yarn tucked in, they are put into nylon stockings, tied off with string that is not the same wool because you do not want it to felt, then thrown into the washing machine for a hot wash with any other items that are washed on hot. They are then dried on high heat. I have a big old top loader and it took two cycles of washing for mine to felt, and really I wasn’t sure if they had until after the high heat drying. Lani has a more modern front loader and says hers typically take 3 or 4 wash cycles before felting.

WP_20180308_11_45_39_Pro_(2)[1]

To use these you need 3-5 balls so they are creating space in your load to allow for faster drying and they soften the fabric as they bounce around and pummel the clothes. You can add a drop or two of essential oils to the balls for scenting. I’d start small and add more the next time if it isn’t enough for you. I’m excited to use mine and to play with the scenting myself! Thank you Lani!!!

3645E236-F1EC-43CE-A87B-E0E7CC5B3204[1]
What they look like after felting
Please subscribe for weekly posts about herbs, natural health, and green beauty, and please share this with anyone who might be interested.