Creamy Cauliflower Soup DF/GF

This is a reblog inspired by the fact that I made this soup again today after a blustery fall walk. It’s not only windy here today, but there are also intermittent downpours and epic thunder which is a rare occurrence here. I managed to take my dog out during a break in the rain and was rewarded with the pretty trio below. After our windy walk, this soup tasted especially warm and lovely.

The only things I’ve changed since posting this five years ago is that I use even more garlic now, closer to 6 cloves (yum), and I use an immersion blender instead of the stand up one in the video below. It is so much easier with the immersion blender! Use one if you have one. Also, this soup definitely needs bread to accompany it and really anything works. I’ve liked Rudi’s gluten free loaves lately and just toasted up two of their sourdough slices today to make it a full meal. Here’s the reblog from October 31, 2018:

I originally wrote this recipe for Basmati.com which has a wealth of Ayurvedic inspired wellness information, but I wanted to share it here too because it is one of my favorite soups. It has several steps but it is all very easy to do and it’s worth it, trust me. I’m not one of those people who embraced using cauliflower as rice or as any kind of grain substitute as was all the rage for a while there, so I’m not a huge lover of all things cauliflower, but this soup is delicious. The garlic and leeks are what really make it special so I add in a lot of those, but you can definitely tone it down if you don’t care for the allium family that much. Garlic is so healthy for the cardiovascular system and also for keeping germs and viruses away though that I recommend large doses if you can handle it.

In a family with gluten, dairy, soy, egg, and nut intolerances, indulging in creamy anything is quite rare. My oldest son and I are big soup lovers, though, and he especially loves creamy soups, so I’ve tried my hand at several vegan recipes using coconut milk, but we just aren’t always in the mood for the subtle taste of coconut. I’ve discovered that with enough olive oil in the cooking process, and by roasting the veggies first, we can end up with a creamy soup without any dairy or dairy alternatives whatsoever – and the taste is truly superb. It is one of those meals that you have to remind yourself is actually incredibly healthy –  just veggies, olive oil, herbs, and spices –  because it really does taste like a decadent treat. Here’s the recipe:

Creamy Roasted Cauliflower Soup

  • 1 medium to large head of cauliflower
  • 1 large leek
  • 2-4 cloves of garlic, depending on taste (I use 4 because I like it good and garlicky)
  • 1 small-medium yellow onion
  • 4 cups of vegetable stock
  • About 2-3 Tbs olive oil
  • ½-1 tsp sea salt
  •  Several turns of fresh ground pepper to taste (you can always add more, so start on the smaller side)
  • 1 tsp or more Herbs d’Provence or thyme

Preheat oven to 425 degrees Fahrenheit and pour olive oil onto a cookie sheet (or some other roasting pan) and rub it around until the bottom is covered, or cover the bottom with parchment paper. Chop the cauliflower and leek up into bite size pieces and put them on the pan to roast with the garlic cloves. Pour olive oil on top of the vegetables, trying to make sure each piece has been touched. I do this by pouring the oil in a crisscross fashion over the pan, and then I roast the vegetables for about 30 minutes, turning them over once or twice during that time. They will be done when there are brown bits on top in places.

Meanwhile, chop the onion and sauté it in about 1 Tbs olive oil in a large pot on medium-high heat until translucent (about 3 minutes).This is also when I like to put the salt, pepper, and herbs d’Provence (or thyme) in the pot, but remember: you can also add more salt and pepper later, so start with small amounts. The soup is so flavorful with the garlic that you might be surprised at how little salt in particular that you need.

Add the four cups of vegetable stock to the pot and bring to a quick boil before turning it down. When the vegetables are finished roasting in the oven, put them in the pot of soup and let it all simmer together for about 5 minutes before turning off the burner and letting it cool a bit prior to blending. Pour the soup into a blender and watch it turn into creamy deliciousness in less than a minute, and then taste to make sure it has enough salt and pepper to your liking.

Subscribe to my YouTube Channel

I’ve been searching for this all my life

OK, maybe not ALL my life, but as long as I’ve been cooking gluten-free foods, I’ve looked for gluten-free tortellini and have never found any (other than mail order frozen stuff which never looked appealing.) This is fresh pasta, found in the refrigerator section (although could potentially be found in the freezer section) AND there is a dairy free version as well. Cue the heavenly choir!

Manini’s is a local company here in the greater Seattle area (I’m not affiliated), but they have a wide presence and you can find their products through Amazon Fresh. Their 4 cheese tortelloni (not sure where they are getting their spelling from but I guess I’ll adopt it here) is a favorite with my youngest son and I enjoy it too, although the real reason I have searched high and low for this sort of pasta is to make tortellini soup. My oldest requires the dairy-free version so I plan on making the soup using the dairy free version when he’s home from college over the holidays.

Have a festive Thanksgiving to all those in the U.S. this week. I am grateful for you!!

Updated Muffin Recipe

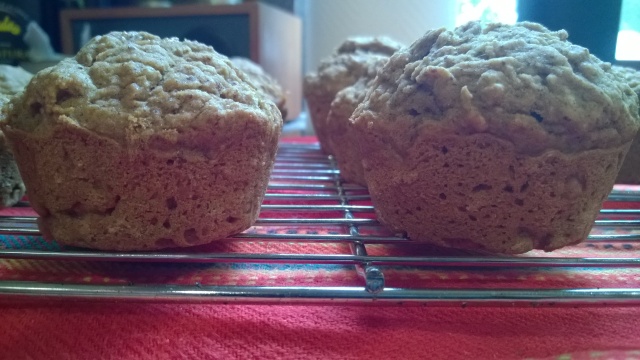
Gluten-free Dairy-free muffins

Fall hasn’t truly set in here but the urge to spend more time in the kitchen has shown up on time anyway. We didn’t need muffins in the house, especially now that we are down to two, but muffin baking beckoned regardless. My original vegan take on Bob’s Red Mill gluten-free recipe for blueberry muffins can be found here, but it never quite right to me. Yesterday, instead of looking at what I’d done before, I started from scratch with Bob’s recipe and modified it anew, but this time I used eggs instead of an egg replacer. If you want these to be vegan, just use your favorite egg replacement. (Mine is simply to use 1 tablespoon of flax seed meal with 3 tablespoons of warm water per egg.) As last time, my recipe does not include any berries because my son prefers baked goods without berries, but 1.5 cups of blueberries can be added, or if you have raspberries, those would be especially good with the vanilla and cinnamon. These muffins are great without any berries though and taste almost like a biscuit, but not quite. (I think the 2 teaspoons of baking powder are also what give it a biscuit-y taste.)

This recipe that I manipulate is right on the back of Bob’s Red Mill’s Gluten-free One-to-One flour which is my favorite gf flour for baked goods. It’s easy to use and it saves me from buying a handful of different flours to mix and match trying to find the perfect blend. The other main thing I do with this recipe is to reduce the sugar by quite a bit, and to use both cane sugar and brown sugar. This might be why my muffins end up tasting somewhat like a biscuit instead of just a pure muffin, but they are still tasty as can be. Whenever I make these, I go ahead and double the ingredients to make 24 muffins, but the following is for 12 regular-sized ones.

Vanilla-Cinnamon Gluten-free, Dairy-free Muffins

(I am affiliated with Mountain Rose Herbs but not with any of the other pages I have linked to.0

2 Cups Bob’s Red Mill GF 1-to-1 Baking Flour

2 tsp baking powder

1/2 tsp salt

1/2 cup vegan butter

1/2 cup cane sugar

1/2 cup brown sugar

1 tsp cinnamon

1 tsp vanilla extract (here’s how to make your own!)

2 eggs

1/2 Nutpod French Vanilla Oat Creamer

1.5 cups of optional ingredients such as blueberries, raspberries, or even chocolate chips

Start by preheating oven to 425 degrees and prepping your muffin pan with either paper liners or spray oil. Add the dry ingredients (besides the sugar) together in a bowl and stir. Cream the sugar and softened vegan butter together with a hand mixer. Add the vanilla and mix again. Add the eggs and mix, then add the dry ingredients a bit at a time while mixing, rotating with adding the half cup of oat creamer. At this time, you can add in any other ingredients that you want, such as 1.5 cups berries or chocolate chips, but they taste great just plain. It’s a very thick batter, not runny at all. Scoop the batter into a prepared muffin pan for 12 normal sized muffins. Put the pan in the oven and immediately turn down the temperature to 375 degrees. Bake for 30 minutes, then let them cool on a cooling rack for at least five minutes before digging in.

Gluten-free, Dairy-free Muffins that you can add berries to if you like or eat plain like we do

I hope the call to the kitchen continues and I get back to soup making soon, but where I live has a tiny kitchen compared to my old place which makes it a little less inviting. I shouldn’t complain, and I’m not because honestly, I love where I live and think it’s far better than my old place for many reasons, but cooking just hasn’t been the joy it once was lately. I’m finding joy in other things though, and I hope you too are indulging in joys every day.

Happy fall y’all! 🍂 (And happy spring to those in the southern hemisphere🌷).

Allergen Free Specialty Breads

A couple of weeks ago I stumbled upon My Bread Gluten Free Bakery and since they have styles of gluten-free bread that are rather hard to find, I decided to give them a try although I personally dislike buying groceries online. I figured that they would be a fun treat and that I could then go on with life as before. The good news is that the boys and I love the bread, all the styles we tried are amazing, and the bad news is that I’ve slipped further into the online grocery shopping hole.

You can find this brand in some stores, but the only one near me is in a close by city which I rarely go to. If you look for it at a store, it might be in the freezer section but don’t let that bother you because the bread perks up really nicely. I’m not affiliated with them but I have a referrer code that gets you $3 off your order (and I think they will send me $3 off my next order too~ win-win!) so if you buy online, use this code: http://mybreadglutenfree.refr.cc/kristenschuhmann and this month (May 2021) if you order $50 worth of products (trust me, it’s easy to do) then add Soft Breadsticks to your order, the breadsticks are free! The soft breadsticks are one of the things that we always buy and love so that is a great bonus.

The breads are not only gluten-free, but also dairy free, soy free, nut free, and egg free. We love the baguettes for making sub sandwiches and “cheesy bread”, the soft breadsticks are perfect with salads and soups, and the flatbreads are delicious warmed up like pitas or made into personal pizzas. We make regular pizzas on these with red sauce and cheese (vegan cheese for some of us~ we like Daiya shredded mozzarella and cheddar), but we like even more rubbing olive oil on these and adding grilled chicken, garlic, red onions, artichoke hearts, basil, and oregano, preferably with a side salad.

Flatbread Pizza

In other food allergy news, my sister sent me this article stating that milk allergies are now causing more severe reactions that tree nuts and peanuts. Usually we think of milk allergies as simply causing discomfort, but this article shows that kids are ending up in the hospital and having severe anaphylaxis reactions. Most people do eventually outgrow milk allergies, but they are learning now that the age is generally later than formerly thought. Keep in touch with your doctor about the latest thinking over when to retry milk if you or someone you love has been diagnosed with a milk allergy.

Let me know if you give My Bread Gluten Free Bakery a try! They have other goodies than the ones I mentioned, but those are the ones that are hard for me to find in my usual grocery haunts!

Vegan Foods and Supps to Try

These are the latest samples I recieved from the New Hope Influencer Co-op and as usual, there are some real gems in here!

First the food. These Umami Snaps are made of chickpeas, are gluten-free, nut-free, and vegan. Their taste reminds me of roasted chickpeas with a lot of garlic powder, but the texture is more like a thick rice cracker. It’s an addictive combination! These are really tasty and I can imagine eating them with Indian food, although we just snacked on them straight. They also boast more protein than the usual carb-y snack.

We were able to sample vegan Mexican dips again from Zubi’s which was a treat. Just like last time, we loved them all but the Crema de Jalapeno was our favorite. The vegan queso is one of those things that I didn’t realize I missed (since I rarely eat dairy) but once I had it I wanted to create a meal around it. If you are creating a gift basket for a vegan friend anytime soon, include Zubi’s queso and crema for sure, and I promise they will love you for it.

We all have immunity on our minds this time of year, especially this year, and this immune+ from youtheory is a great combination of mushrooms, vitamins C and D, and zinc. If you want to take one immune supporting supplement instead of dealing with three or four different bottles, this is a great one to try.

The SuperGrapes from humann are surprisingly tasty. I’m not sure what I was expecting but I was quite pleased that the instructions said to take 2 and not just one after trying this for the first time. They are gluten-free and vegan and are full of grape seed extract sourced from the Loire Valley in France. If you aren’t drinking your daily glass of red, you can supplement with these delicious squares. According to the packaging they promote energy, normal blood pressure, and and antioxidant support which all sounds great to me!

There will be more to share when we try more of these goodies. I’m especially excited to try the face serum and collagen coffee so if you are interested those too, stay tuned for an update coming soon!

Chocolate Chip Cookie Cake (GF, Vegan, Soy Free)

It’s my son’s ‘sweet 16 in quarantine’ birthday and we decided a cookie cake was just the thing for celebrating. Usually we have traditional (gf) cakes for birthdays but considering we are just three beings sheltering in place without any chance of friends coming by to celebrate, a cake just seemed too much. I suggested a cookie cake to my son and he said he’d never had one (?!) and that it sounded great. That got me thinking…where have all the cookie cakes gone? I seem to recall every mall in the 90’s having a specialty store that sold nothing but cookie cakes. One year in high school I got my then boyfriend one for Valentine’s Day and then somehow ended up carrying it sideways to get it through a small space which of course made it a cookie lump, instead of a cookie cake. Apparently it was still tasty anyway, and of course it was because cookie cakes are ridiculously good no matter what, right?!

I found a recipe on Pamela’s website and intended to use it with Pamela’s Baking and Pancake Mix, but I realized just in time that there is dairy in the mix and my son has been really trying to keep all dairy out of his diet so that wasn’t going to work. I replaced the mix with Bob’s Red Mill One to One GF Flour and added salt, baking powder, and baking soda, and also substituted the egg with flax and water and the butter with vegan butter. Here’s the link to Pamela’s directions if you want to do a (simpler) dairy and egg version, and below is the recipe that I did with all the modifications.

GF, Vegan Chocolate Chip Cookie Cake:

DIRECTIONS

I put a piece of parchment paper in my 9 in circular pan and preheated the oven to 325°. I went ahead and put the flax in a small mug with the water because it take about 10 minutes to thicken into a proper egg replacement. Next I softened the vegan butter a bit before creaming it with the sugars. After that, I added the flax with water and vanilla to the bowl and mixed well. Once everything was fairly well blended, I added the flour, baking soda, baking powder, and salt and blended again until well mixed. Then I added the chocolate chips and 1 Tbs of nutpods creamer because it just looked a tad too dry. You can use any non dairy milk you have on hand if your mix looks dry as well. Pour the dough into the pan and spread it out as flat as possible. Bake for 33 to 38 minutes, checking the middle with a toothpick or fork before taking it out to cool. Mine took 35 minutes and then about an hour to fully cool enough to decorate.

finishedcookiecake

Celebrations are looking pretty different these days but I hope you are all doing well and have something to celebrate in this strange time, even if it’s just the change of seasons.

Health and happiness to you!


Dairy-free is the New Dairy

Moooooove over gluten, dairy is the new star ‘free from’ food.

Is it just me or is the dairy-free food group going through a renaissance just as the gluten-free food aisle did a few years ago….? It sure seems to me like there are new dairy-free options popping up all over the place, and color me happy about it. Neither my oldest son nor I can eat much dairy without it causing problems, and we certainly have company in that arena. I’ve heard that the only people who can successfully digest dairy are those (heritage-wise) from Northern European countries, but I don’t know how accurate that is. It seems some people react to the casein, some to the lactose, and some just to all of it. Dairy is a wide category though and it’s important to note that some people can handle things like yogurt, kefir, and some cheeses because of the way they are made with cultures, and for some people it’s a matter of quantity. They might eat a little cheese a couple of times a week and have no problems, but eat dairy every day and lots of problems. And of course there seem to be more vegans all the time so they are definitely driving this dairy-free trend as well.

We tried Daya’s new gluten-free and dairy-free Alfredo style mac and cheese and were pleasantly surprised by the taste. I added cracked pepper on top and it was quite close to a regular gluten and dairy-full Alfredo. We were impressed for sure! I added stir-fried smoked salmon, broccoli, garlic, and onion on top which certainly made it taste less like it was out of a box, but the next day we ate leftover Alfredo just plain and it was great. I’ll be stocking up on Daya for quick and easy dinners.

I’ve also been making my son pizzas with vegan pesto from Trader Joe‘s and shredded dairy-free mozzarella style cheeses. One is from Trader Joe’s and the other is from a company called Violife whose whole line looks promising. He likes both cheese brands and thinks they taste very similar.IMG_0709

We both like different dairy-free yogurts. He likes the vanilla coconut yogurt from Trader Joe’s and so do I but it has more sugar than I like, so I eat So Delicious‘s unsweetened version of vanilla. I was curious what other dairy free goodies are now out there that I should try out on my son and I, so I checked out what New Hope discovered at Expo West and found some tasty-looking treats to share.

(The following portions of this post was provided by New Hope Network. I am a member of the New Hope Influencer Co-op, a network of health and wellness bloggers committed to spreading more health to more people.)

Culina Botanical Yogurt AlternativeCulina
One of the best nondairy yogurts we’ve ever tasted, Culina won us over with its ultra-creamy cultured coconut base, floral botanical add-ins (the Strawberry Rose flavor was beautiful) and lack of plastic packaging. Instead, each yogurt is packaged in a terra cotta flower pot lined with a food-safe, biodegradeable glaze.

Bla Bla Foods Valling Oat MilkValling

Swedish moms favor giving välling, a thick, creamy oat beverage, to toddlers before bedtime for a filling, healthy boost of vitamins, minerals and calories. Bla Bla Foods’ version features organic gluten-free oats, organic coconut milk powder and organic pea protein. Add two tablespoons to warm water and stir to prepare

Ripple Nutrition Chocolate Dairy-Free Protein Shakeripple
A single-serve, ready-to-drink plant-based beverage that packs in 20 grams of plant protein derived from peas. Sweetness and flavor comes from the addition of organic cane sugar, monk fruit extract and cocoa powder.

Mooala Organic Oatmilk Unsweetened Coconutmooala
Oatmilk was a trending plant-based dairy option at Expo West, and Mooala earns points for launching an unsweetened, USDA Organic blend. This version is blended with organic coconut cream for improved consistency.

Malk Sprouted Organic Oat Malk OriginalMalk
This brand’s dedication to simple formulations and conscious sourcing shine through with this USDA Organic, sprouted oatmilk. Bonus: Malk also pursued The Detox Project’s Glyphosate Residue Free Certification to quell worries about glyphosate-contaminated oats, which is printed on the back of the product packaging.

Milkadamia Macadamia Buttery Spread butteryspread
This beloved nondairy milk brand launched a plant-based buttery spread at Expo West that employs silky, rich macadamia oil to add body and flavor. We also like how no palm oil is used in this formulation.

Wildbrine Plant Based Creamery Cultured Cashew Brie Alternative Beet Blush brie
The fermentation experts at Wildbrine bring their expert knowledge of microbes into the plant-based dairy category with this excellent cashew brie. Tinted with a hint of beets, this USDA Organic plant brie will steal the limelight at cheese parties.

Sprout Living Drinkable Oats Matcha Plant-Based Instant Powder Mix sproutliving
Infused with antioxidant-rich matcha, this oat-based meal replacement also contains nutrient-dense sunflower seed protein, spirulina, golden flaxseed and so much more. We dig the USDA Organic certification, too.

If you try any of these, let me know how it goes! I’m looking forward to trying all of them, especially the brie because brie! and that Culina yogurt because the packaging is superb. If you have a favorite dairy-free food to share, I’d love to hear about that too. Thank you for reading and please share with any vegans or dairy intolerant people you may know.

Gluten-Free Vegan Chocolate Chip Scones

The other day I was working on some herbal crafts for a class I’ll be teaching in a couple of weeks, and things were not quite working out as I wanted. I was starting to get frustrated, and for some reason thought that trying to work out a new gluten-free, vegan scone recipe might be just the answer. It could have turned out badly, adding to the list of creative projects gone wrong, or at least sub-par, that day, but luckily, these turned out good. Really good in fact. These rival the gluten-free, vegan scones we used to be able to get at a local bakery which just closed last month, and they came together quickly~ no refrigerating the dough or anything that makes a more time consuming baking project. You can make these with butter and milk if you aren’t interested in keeping these dairy free, and two eggs will work instead of the flax meal + water. The cinnamon is optional but it gives the dough extra pizzazz. I used Bob’s Red Mill’s Gluten-Free Baking and Biscuit Mix which is a self-rising flour mix. If you don’t used Bob’s, pick another mix that is self-rising, such as Pamela’s.

Gluten-free, Vegan Chocolate Chip Scones

2 1/2 cups Gluten-Free Baking and Biscuit Mix (Bob’s Red Mill)

1/2 teaspoon of Sea Salt

1/4 cup sugar

2 teaspoons baking powder

6 tablespoons coconut oil, kept solid (room temperature)

3/4 cup coconut milk (I like unsweetened vanilla but you can use any kind of milk you wish)

2 tablespoons of flax meal mixed with 6 tablespoons of warm water (or 2 eggs)

2 teaspoons vanilla extract (or make your own)

1 teaspoon cinnamon powder

1 1/2 cups chocolate chips

Preheat the oven to 400°F. Line a baking sheet with parchment paper. In a small bowl, add the water to the flax meal and set aside for about 10 minutes. In a bigger bowl, whisk together the flour, salt, sugar, cinnamon, and baking powder until thoroughly combined. Add the coconut oil, working it in until the mixture is unevenly crumbly. There will still be a lot of loose, dry flour at this point. Whisk together the coconut milk and vanilla  with the flax mixture and then add it to the dry ingredients, along with the chocolate chips. Thoroughly mix.

3614622A-26DD-414F-A306-9725AC4019B3

Transfer the dough to a floured work surface. Gently pat and round it into a circle. Cut the dough into 8 shapes, or more for mini-scones. 

CA091EA1-8964-466E-B2D9-984234B96E82

Put the scones spaced-out evenly on the prepared pan.
WP_20190118_06_31_31_Pro

Bake the scones for 20 minutes, until they’re golden brown. Remove them from the oven, and let cool on a wire rack after first cooling about 5 minutes on the pan.

Store in the fridge in an airtight container and eat within three days, or put them in the freezer.

These scones are by far the easiest, quickest scones I’ve ever made. When you are in the mood to bake something but don’t have much time, these should definitely be on your go to easy-bake list. Please share with anyone who bakes gluten-free goodies, and subscribe for a weekly wellness post.


Dairy-Free Creamy Cauliflower Soup

I originally wrote this recipe for Basmati.com which has a wealth of Ayurvedic inspired wellness information, but I wanted to share it here too because it is one of my favorite soups. It has several steps but it is all very easy to do and it’s worth it, trust me. I’m not one of those people who embraced using cauliflower as rice or as any kind of grain substitute as was all the rage for a while there, so I’m not a huge lover of all things cauliflower, but this soup is delicious. The garlic and leeks are what really make it special so I add in a lot of those, but you can definitely tone it down if you don’t care for the allium family that much. Garlic is so healthy for the cardiovascular system and also for keeping germs and viruses away though that I recommend large doses if you can handle it.

In a family with gluten, dairy, soy, egg, and nut intolerances, indulging in creamy anything is quite rare. My oldest son and I are big soup lovers, though, and he especially loves creamy soups, so I’ve tried my hand at several vegan recipes using coconut milk, but we just aren’t always in the mood for the subtle taste of coconut. I’ve discovered that with enough olive oil in the cooking process, and by roasting the veggies first, we can end up with a creamy soup without any dairy or dairy alternatives whatsoever – and the taste is truly superb. It is one of those meals that you have to remind yourself is actually incredibly healthy –  just veggies, olive oil, herbs, and spices –  because it really does taste like a decadent treat. Here’s the recipe:

Creamy Roasted Cauliflower Soup

  • 1 medium to large head of cauliflower
  • 1 large leek
  • 2-4 cloves of garlic, depending on taste (I use 4 because I like it good and garlicky)
  • 1 small-medium yellow onion
  • 4 cups of vegetable stock
  • About 2-3 Tbs olive oil
  • ½-1 tsp sea salt
  •  Several turns of fresh ground pepper to taste (you can always add more, so start on the smaller side)
  • 1 tsp or more Herbs d’Provence or thyme

Preheat oven to 425 degrees Fahrenheit and pour olive oil onto a cookie sheet (or some other roasting pan) and rub it around until the bottom is covered, or cover the bottom with parchment paper. Chop the cauliflower and leek up into bite size pieces and put them on the pan to roast with the garlic cloves. Pour olive oil on top of the vegetables, trying to make sure each piece has been touched. I do this by pouring the oil in a crisscross fashion over the pan, and then I roast the vegetables for about 30 minutes, turning them over once or twice during that time. They will be done when there are brown bits on top in places.

Meanwhile, chop the onion and sauté it in about 1 Tbs olive oil in a large pot on medium-high heat until translucent (about 3 minutes).This is also when I like to put the salt, pepper, and herbs d’Provence (or thyme) in the pot, but remember: you can also add more salt and pepper later, so start with small amounts. The soup is so flavorful with the garlic that you might be surprised at how little salt in particular that you need.

Add the four cups of vegetable stock to the pot and bring to a quick boil before turning it down. When the vegetables are finished roasting in the oven, put them in the pot of soup and let it all simmer together for about 5 minutes before turning off the burner and letting it cool a bit prior to blending. Pour the soup into a blender and watch it turn into creamy deliciousness in less than a minute, and then taste to make sure it has enough salt and pepper to your liking.

This soup is best with an herb-y bread to dip into it, such as focaccia or rosemary bread. I usually make my own focaccia style bread sticks with Trader Joe’s flat breads by adding olive oil, some seasoning salt, rosemary, basil, and oregano to the top of the flat breads and baking them at 425 for 10 minutes.

Canyon Bakehouse has a delicious gluten-free and dairy-free focaccia also, but if you can eat gluten I recommend rosemary bread such as The Essential Baking Company’s yummy version.

Please share this with anyone who might be interested, and please subscribe for a weekly wellness post if you haven’t already. It’s free and you can unsubscribe any time.  Happy Halloween to all who celebrate!


Zucchini Muffins (Gluten-Free, Dairy-Free, Egg-Free, Nut-Free)

My sons still talk about the zucchini muffins I made years ago and ask me to make them again. I only made them once because shredding the zucchini by hand took me ages that first time, but now I’m ready to try again with perhaps the help of the blender. I looked up the recipe on my old blog and found I’d written it in 2014! Those muffins must have been better than I remember for my kids to still have a hankering for them four years later. Here’s the (slightly edited) original post with the recipe, though next time I’ll probably add another teaspoon of cinnamon which means a full tablespoon.

My friend gave me a zucchini the size of large 2 month old baby so I figured I’d switch my plan of making pumpkin scones to zucchini muffins. After looking for a recipe online that I could play with, I realized there wasn’t much out there that had all our needs covered~ gluten, dairy, egg, and nut free, so the “playing’ part was rather extensive. Anyone who believes that old adage, “Baking is a science, cooking is an art” has obviously never baked with food intolerances in mind. I can’t say it’s a perfect recipe as it was indeed my first go at it, but they didn’t crumble (and no xanthan gum!) and they taste pretty good. (My kids love them.) Plus we used that freaky zucchini so now my sons no longer have a prop pretending to be cavemen which was getting to be a bit much every time we were in the kitchen. I must admit though, it really did look like a primitive weapon. Here’s the recipe:

zucchinimuffins3

Ingredients:

2 T flax meal + 5 T water (set aside at least 10 minutes)

2 C grated Zucchini

1/2 C apple sauce

1/4 C sunflower oil

1 t vanilla extract

1 C brown rice flour

3/4 C oat flour (make sure it’s gluten-free)

1/2 C millet flour

1/4 C tapioca flour

3/4 C brown sugar

2 t cinnamon (or more~ actually will do more next time, but it’s personal taste)

1 t nutmeg

1 t baking soda

Preheat oven to 350. Prep muffin pan with oil, spray oil, or liners. Add the grated zucchini, apple sauce, oil, vanilla extract, and flax that has soaked in water all together and mix well. In a separate bowl mix the dry ingredients together before blending the wet and dry together~ easily done with a spoon, no need to get your mixer dirty. Fill the muffin pan~ 12 regular sized muffins. Cook for 23-25 minutes.

Two zucchini muffins
Don’t these look good for a recipe without xanthan gum?!

These were good out of the pan but I did think a little more cinnamon would have made them better so I sprinkled some cinnamon sugar on top. My boys don’t mind the extra sweetness although they’ll probably miss running through the kitchen yelling “Aaarrrgh” with the zucchini.

It’s not quite the 2018 zucchini season here yet although the berries have been going strong for a couple of months now, so I’m expecting it won’t be long before backyard summer veggies start popping up. Happy Summer Solstice! Make sure you enjoy the sun safely this summer and please subscribe for weekly posts about herbs, natural health, and green beauty, and please share with anyone who might benefit from this article.